
Motivation
One of the main features that I’ve always been impressed with ACI is its capabilities to integrate with popular virtualization domains- VMWare, OpenStack, Microsoft SCVMM, Kubernetes, etc. There have been quite a lot of resources covering ACI integration with VMWare in great details. You can find the lab guide in any Cisco DC specialization courses such as DCVAI / DCAC9K, and many other sources you can google for yourself. However, there are not as many for OpenStack. This tutorial is based on Cisco’s official installation guide, adapted to a newer OpenStack release (Queens) on Ubuntu 18.04 Bionic. I hope it will be helpful for those who are seeking a quick and easy way to setup an OpenStack environment with ACI integration. In the future posts, I may write about some key benefits, features, and mechanisms of this ACI-OpenStack integration.
Lab setup
The installation steps will be different depending on your OpenStack distributions and your choice of automated installation tool. If you want to learn more about methods of automated OpenStack installation (e.g. Triple-O, Kola-Ansible, etc.), you might also want to check out the “OpenStack Installation and Deployment” course on Udemy.
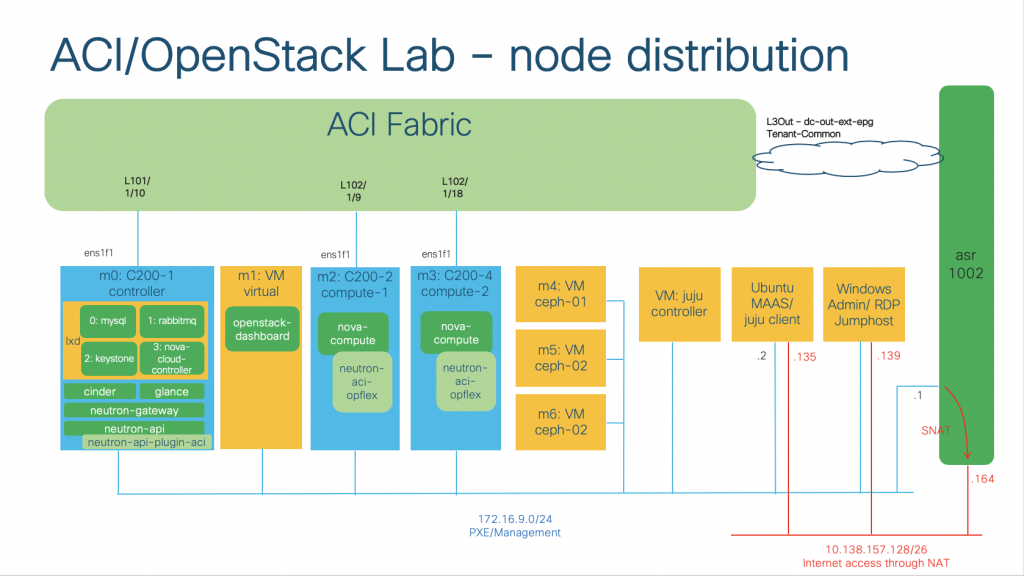
In our lab, we will be using MAAS/Juju to automate the installation process. You can refer to my previous series for the guide. The overall topology is as follows:

We will have 7 machines which have been commissioned in the MAAS cloud and are in the “Ready” state on MAAS:
- 03 bare metals UCS C200 servers (m0, m2, m3). Each server has a dedicated NIC (es1f1) connecting to ACI fabric.
- 04 virtual machines (m1, m4, m5, m6)
We will consume these machines to deploy OpenStack applications using Juju later on.
Getting the integration plugin
First, we need to refer to the ACI virtualization compatibility matrix, available here. We will need to check the OpenStack release, and current ACI version to get the correct plugin software. For example, in our setup:
- OpenStack and OS: Canonical Queens with Ubuntu 18.04 Bionic
- Current ACI version: 4.2(2f)
- The recommended plugin would be 4.2(3.20191220), which we can download from Cisco Software Central here.
Then, we will need access and permissions to download the necessary files:
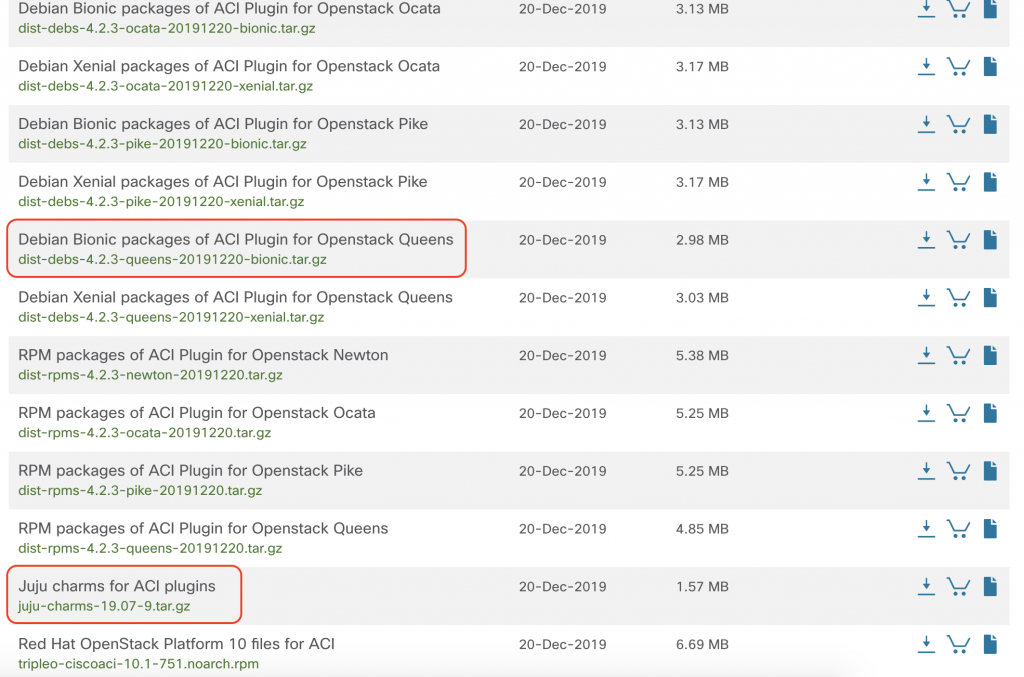
- Debian Bionic packages of ACI Plugin for OpenStack Queens (as we will install OpenStack Queens on Ubuntu 18.04).
- Juju charms for ACI plugins (as we will use Juju for the automated installation)
Preparing local apt repository, charms and configuration files
We will need a local apt repo that the machines can access during the installation. I use reprepro and nginx for this, but there are many other ways to get it done. We need to extract the Debian Bionic packages (first file that we downloaded) and put on the repo server. Take note of the repo URL (e.g. deb http://172.16.9.2 bionic main) because we will need to refer to it in the configuration file.
Untar and extract the Juju charms (second file we downloaded) on the Juju client (e.g. ~/aci-openstack/charms/).
Prepare the ACI fabric and Juju configuration file. We will need to do the following:
- Create a physical domain on ACI and bind it with an AAEP (e.g. OPENSTACK_AAEP)
- Enable Infra VLAN on the AAEP (as we will be installing OpenStack integration in Opflex mode, where the controllers and compute nodes will have IP addresses assigned from the VTEP pool via DHCP on APIC).
We need to put the configured AAEP name in the Juju configuration file. Please refer to my full juju-aci-queens-bionic.yaml configuration for further details.
Deploying OpenStack with ACI integration using Juju
If you prefer a full fledged OpenStack setup with HA, you can refer to OpenStack documentation. In my lab, the machines will be deployed with the OpenStack core functions as follows:
- Machine m0 (bare metal): OpenStack controller
cinder(with sub-ordinatecinder-ceph),glance(withcephintegration) – install from charmstoreneutron-gateway,neutron-api(with sub-ordinateneutron-api-plugin-aci) – install from local charms
- On LXD containers:
mysql,rabbitmq,keystone,nova-cloud-controller– install from charmstore
- Machine m1 (virtual machine): OpenStack dashboard (Horizon)
openstack-dashboard– install from charmstore
- Machine m2, m3: OpenStack Compute Nodes
nova-compute(with sub-ordinateneutron-aci-opflex) – install from local charms
- Machine m4, m5, m6: CEPH nodes
ceph– install from charmstores
First, we need to create a Juju model and add machines:
juju add-model aci-openstack
juju add-machine --constraints tags=m0
juju add-machine --constraints tags=m1
juju add-machine --constraints tags=m2
juju add-machine --constraints tags=m3
At this point, Juju will deploy the necessary Ubuntu 18.04 OS on those machines. You can check the status with juju status
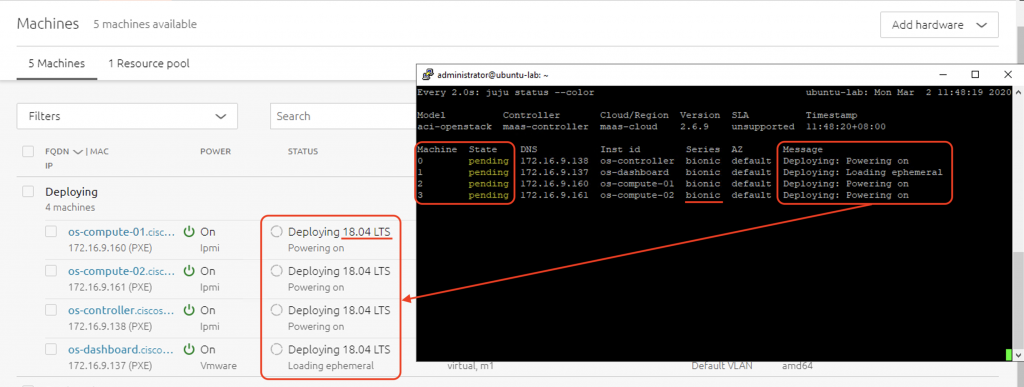
When Juju finishes the OS installation, the machine state will be Deployed. In the next step, we will deploy the charms onto those machines.
CONFIG=/home/administrator/juju-aci-queens-bionic.yaml

juju deploy --config=$CONFIG --to lxd:0 cs:mysql
juju deploy --to lxd:0 rabbitmq-server

juju deploy --config=$CONFIG --to lxd:0 keystone
juju add-relation keystone:shared-db mysql:shared-db

juju deploy --config=$CONFIG --to 0 glance
juju add-relation glance:identity-service keystone:identity-service
juju add-relation glance:shared-db mysql:shared-db

juju deploy --config=$CONFIG nova-cloud-controller --to lxd:0
juju add-relation nova-cloud-controller:amqp rabbitmq-server:amqp
juju add-relation nova-cloud-controller:identity-service keystone:identity-service
juju add-relation nova-cloud-controller:image-service glance:image-service
juju add-relation nova-cloud-controller:shared-db mysql:shared-db


juju deploy --config=$CONFIG --to 0 cinder
juju add-relation cinder:image-service glance:image-service
juju add-relation glance:cinder-volume-service cinder:cinder-volume-service
juju add-relation mysql cinder
juju add-relation cinder rabbitmq-server
juju add-relation cinder nova-cloud-controller
juju add-relation cinder keystone

juju deploy --config=$CONFIG nova-compute --to 2
juju add-relation nova-compute:amqp rabbitmq-server:amqp
juju add-relation nova-compute:cloud-compute nova-cloud-controller:cloud-compute
juju add-relation nova-compute:image-service glance:image-service

juju deploy --config=$CONFIG openstack-dashboard --to 1
juju add-relation openstack-dashboard:identity-service keystone:identity-service

juju deploy /home/administrator/aci-openstack/charms/charm-neutron-gateway --config=$CONFIG neutron-gateway --to 0
juju add-relation neutron-gateway:amqp rabbitmq-server:amqp

juju deploy /home/administrator/aci-openstack/charms/charm-neutron-api  --config=$CONFIG neutron-api --to 0
juju add-relation neutron-api:amqp rabbitmq-server:amqp
juju add-relation neutron-api:identity-service keystone:identity-service
juju add-relation neutron-api:shared-db mysql:shared-db

juju deploy /home/administrator/aci-openstack/charms/charm-neutron-api-plugin-aci --config=$CONFIG neutron-api-plugin-aci
juju add-relation neutron-api-plugin-aci:amqp rabbitmq-server:amqp
juju add-relation neutron-api-plugin-aci:shared-db mysql:shared-db

juju deploy /home/administrator/aci-openstack/charms/charm-neutron-aci-opflex --config=$CONFIG neutron-aci-opflex
juju add-relation neutron-aci-opflex:neutron-plugin nova-compute:neutron-plugin

juju add-relation nova-cloud-controller:neutron-api neutron-api:neutron-api
juju add-relation nova-cloud-controller:quantum-network-service neutron-gateway:quantum-network-service
juju add-relation neutron-gateway:neutron-plugin-api neutron-api:neutron-plugin-api
juju add-relation nova-cloud-controller:quantum-network-service neutron-gateway:quantum-network-service
juju add-relation nova-cloud-controller:neutron-api neutron-api:neutron-api
juju add-relation neutron-gateway:neutron-plugin-api neutron-api:neutron-plugin-api
juju add-relation neutron-api-plugin-aci neutron-api
juju add-relation neutron-aci-opflex:neutron-plugin-api neutron-api:neutron-plugin-api
juju add-relation neutron-aci-opflex:amqp rabbitmq-server:amqp
juju add-relation neutron-aci-opflex:quantum-network-service neutron-gateway:quantum-network-service
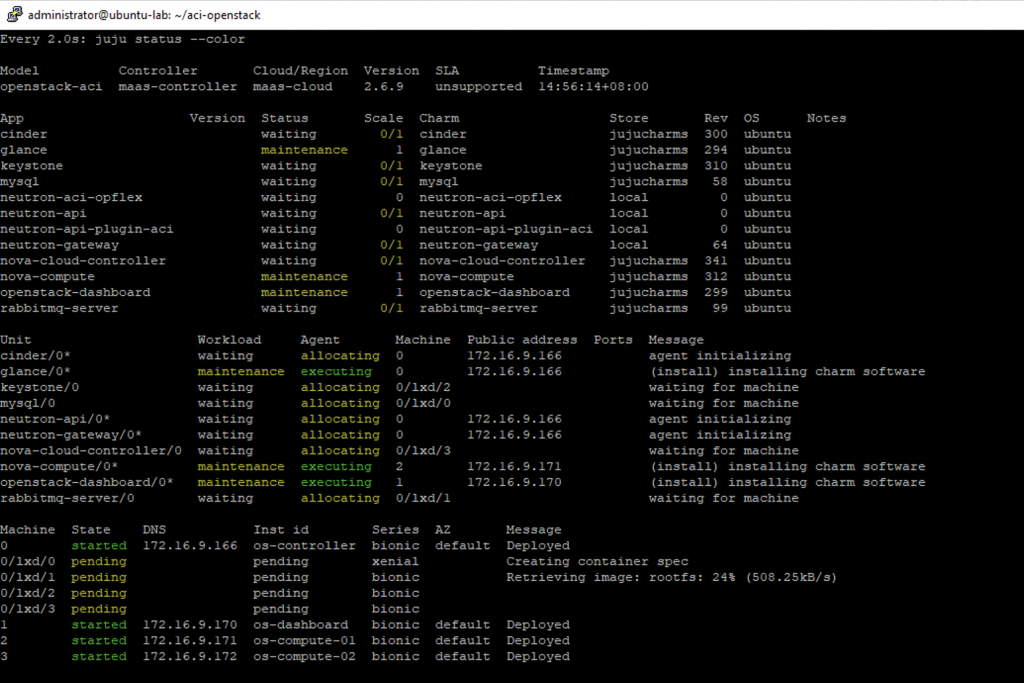
You can watch the installation process using watch -n 2 juju status
Later on, compute nodes (e.g. machine 3) can be added using juju add-unit. The aci plugin subordinate charm will automatically be deployed, but you might need to restart neutron-opflex-agent
juju add-unit nova-compute --to 3
Deploying CEPH backend for Cinder and Glance
We can follow the similar steps to have a 3-node CEPH cluster (on m4, m5, m6) ready for Cinder and Glance.
Configuration file: refer to https://jaas.ai/ceph. My example ceph.yaml:
cat ~/aci-openstack/ceph.yaml

ceph:
  fsid: 36931d5e-84f0-46f7-ba9c-1e14c0267f03
  monitor-secret: AQB701xeuR7yFRAAOdcPWINWH/BXYDpnq+9SRg==
  osd-devices: /dev/sdb
We can deploy the ceph cluster, the cinder-ceph sub-ordinate for cinder and add the needed relations :
juju deploy -n 3 --config ceph.yaml ceph
juju deploy cinder-ceph
juju add-relation cinder-ceph cinder
juju add-relation cinder-ceph ceph
juju add-relation glance ceph
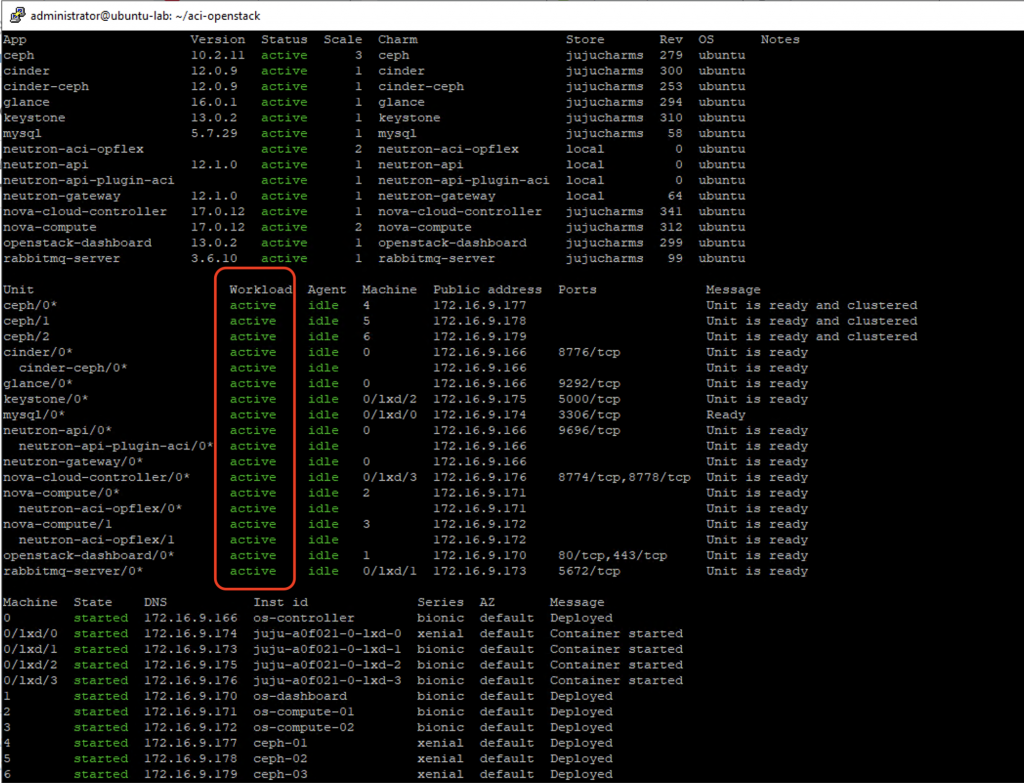
The installation should finish with all green Active status, hopefully.
Troubleshooting tips
The installation might go wrong by different reasons. You should always check juju log by SSH to the node (host or LXD containers) and cat or tail -f the log. For example:
# SSH to the bare metal host:
juju ssh 0
# or any linux containers:
juju ssh 0/lxd/0
# or application:
juju ssh neutron-api/0
tail -f /var/log/juju/unit-neutron-api-plugin-aci-0.log

2020-03-02 07:48:37 DEBUG amqp-relation-changed   File "/var/lib/juju/agents/unit-neutron-api-plugin-a
ci-0/charm/hooks/amqp-relation-changed", line 108, in amqp_changed
2020-03-02 07:48:37 DEBUG amqp-relation-changed     aci_db_setup()
2020-03-02 07:48:37 DEBUG amqp-relation-changed   File "/var/lib/juju/agents/unit-neutron-api-plugin-a
ci-0/charm/hooks/aci_utils.py", line 175, in aci_db_setup
2020-03-02 07:48:37 DEBUG amqp-relation-changed     _neutron_gbp_db_manage()
2020-03-02 07:48:37 DEBUG amqp-relation-changed   File "/var/lib/juju/agents/unit-neutron-api-plugin-a
ci-0/charm/hooks/aci_utils.py", line 124, in _neutron_gbp_db_manage
2020-03-02 07:48:37 DEBUG amqp-relation-changed     subprocess.check_output(cmd)
2020-03-02 07:48:37 DEBUG amqp-relation-changed   File "/usr/lib/python3.6/subprocess.py", line 356, i
n check_output
2020-03-02 07:48:37 DEBUG amqp-relation-changed     **kwargs).stdout
2020-03-02 07:48:37 DEBUG amqp-relation-changed   File "/usr/lib/python3.6/subprocess.py", line 438, i
n run
2020-03-02 07:48:37 DEBUG amqp-relation-changed     output=stdout, stderr=stderr)
2020-03-02 07:48:37 DEBUG amqp-relation-changed subprocess.CalledProcessError: Command '['gbp-db-manag
e', '--config-file', '/etc/neutron/neutron.conf', 'upgrade', 'head']' returned non-zero exit status 1.
2020-03-02 07:48:37 ERROR juju.worker.uniter.operation runhook.go:132 hook "amqp-relation-changed" fai
led: exit status 1
We can reconfig the charms using juju config and try to resolve the charm failure
juju config neutron-api-plugin-aci --file <path_to_config_file>
juju resolve neutron-api-plugin-aci/0
The integration at-first-glance
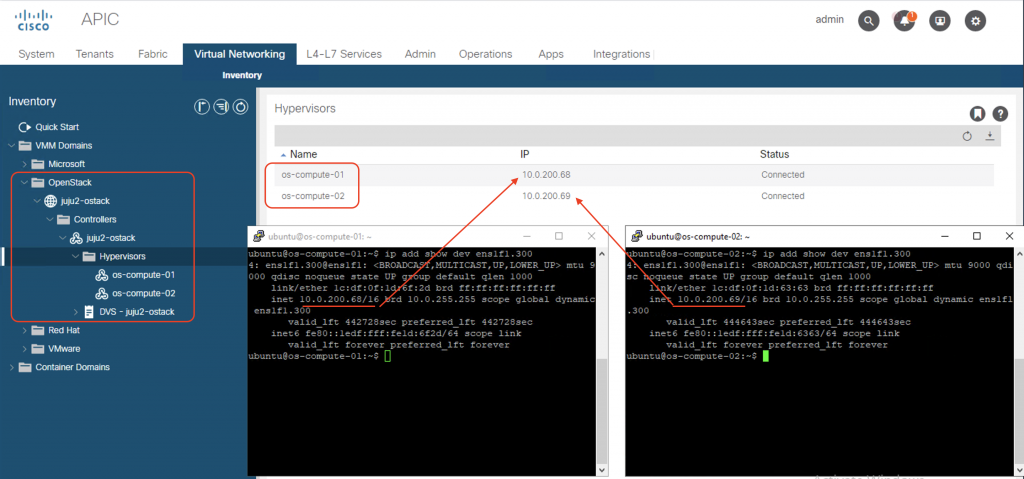
When the plugin is successfully installed, we can see that ACI has created an OpenStack VMM domain, and detected the hypervisors (compute nodes). The VTEP IP addresses assigned to the compute nodes are also shown. They are the IP addresses that the nodes get from APIC (DHCP Server).
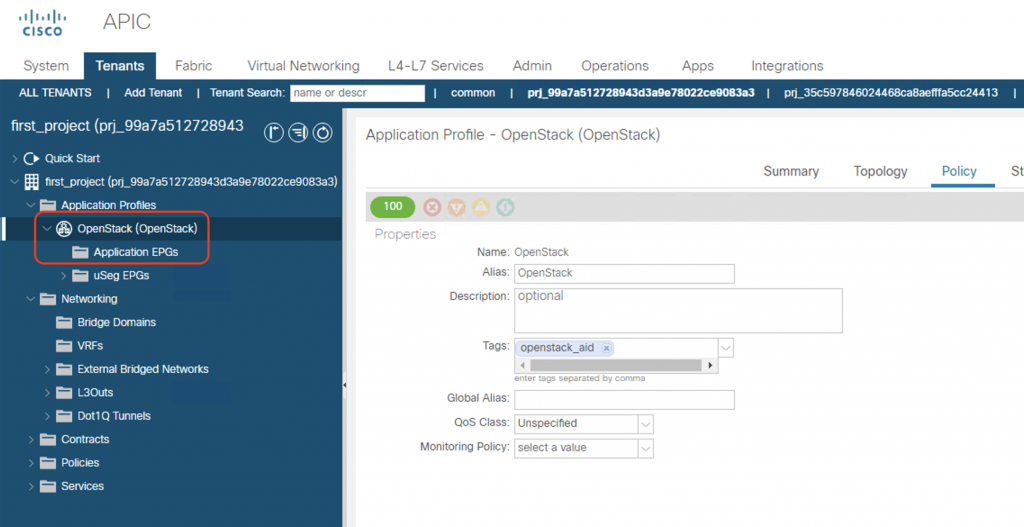
ACI creates a separate tenant (name prj_<project_id> for each OpenStack project, with its on networking constructs (VRF, BD, EPG, etc.)

If we drill down into one tenant (e.g. first_project), we can see ACI has created an Application Profile named OpenStack, but without any EPG and no BD/VRF yet.
Those networking constructs will be defined automatically when we spin up an instance, assign network/subnet, create OpenStack routers, etc. But that will be under scope of the next post. We will look at some key benefits, features, and mechanisms of this ACI-OpenStack integration. So stay tuned!
HI,
I am trying to deploy Openstack using the procedure provide by you but its failing with below error
juju@jujumaas:~$ juju deploy –config=$CONFIG mysql –to lxd:10
Located charm “cs:mysql-58”.
Deploying charm “cs:mysql-58”.
ERROR cannot parse settings data: yaml: line 5: did not find expected key
Hi Rohit,
Let’s look at what is on line 5 of your config file (juju-aci-queens-bionic.yaml). Seems like there is a typo or invalid key for the keystone part. You can try:
keystone:
admin-password: ‘p@ssw0rd’ #In my template you should put in your own password here
log-level: ‘DEBUG’
verbose: true
debug: true
Hi Giang Pham,
Great post.
I can see you deployed 5/6 charms from cisco packages. Is there any reason that you don’t deploy the nova-cloud-controller from that?
Hi Leo,
Yes, some charms need to be deployed from Cisco plugin package as Cisco modified the upstream code to work with the integration plugin. That is why we need to make sure the compatibility between Openstack distro/version and the Cisco integration plugin version.
Cheers,
GP
Thanks mate.
I just went through Cisco guide you mentioned in the post. They also used nova-cloud-controller from Juju Charm Store, not from the Cisco packages.
Have you try to deploy the nova-cloud-controller with the package from Cisco instead?
Hi Lou,
Cisco did not change code for the nova-cloud-controller, hence Cisco did not provide that module in the plugin package. So I used the official charm store instead in my deployment.