
In this post, I will share my experience in setting up an HA Kubernetes cluster. The cluster consists of 3 external etcd nodes, 3 master nodes and 3 worker nodes. The nodes are VMs hosted inside VMWare ESXi (integrated with ACI using VMM domain) on a HyperFlex cluster. However, you can perform the same steps on any standard ESXi deployment with VMM domain integration. In my setup I also use Cisco ACI CNI plugin to provide network connectivities among pods within the Kubernetes cluster. Ansible is used to provide automation to the installation:
- spinning up the VMs on ESXi
- installing HA etcd cluster
- creating an active/standby haproxy as LB for multiple master nodes
- configuring a Kubernetes cluster using kubeadm
- applying ACI CNI plugin to have a fully working K8S cluster.
[Edit] I put the Ansible playbook code and the Jinja2 template files on my Github repo.
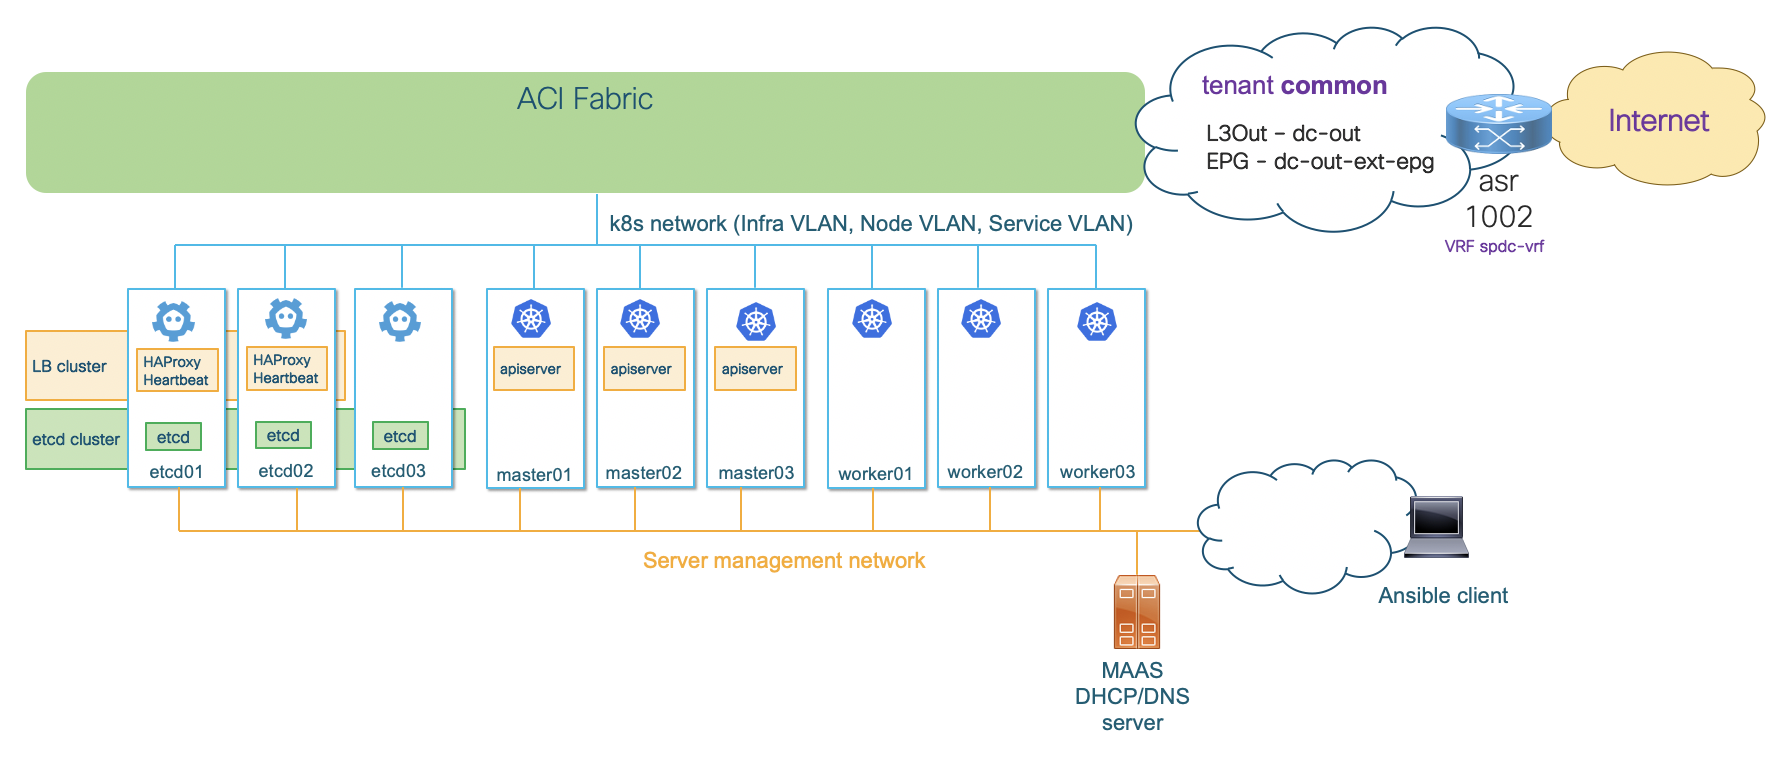
The setup at high level looks like below:
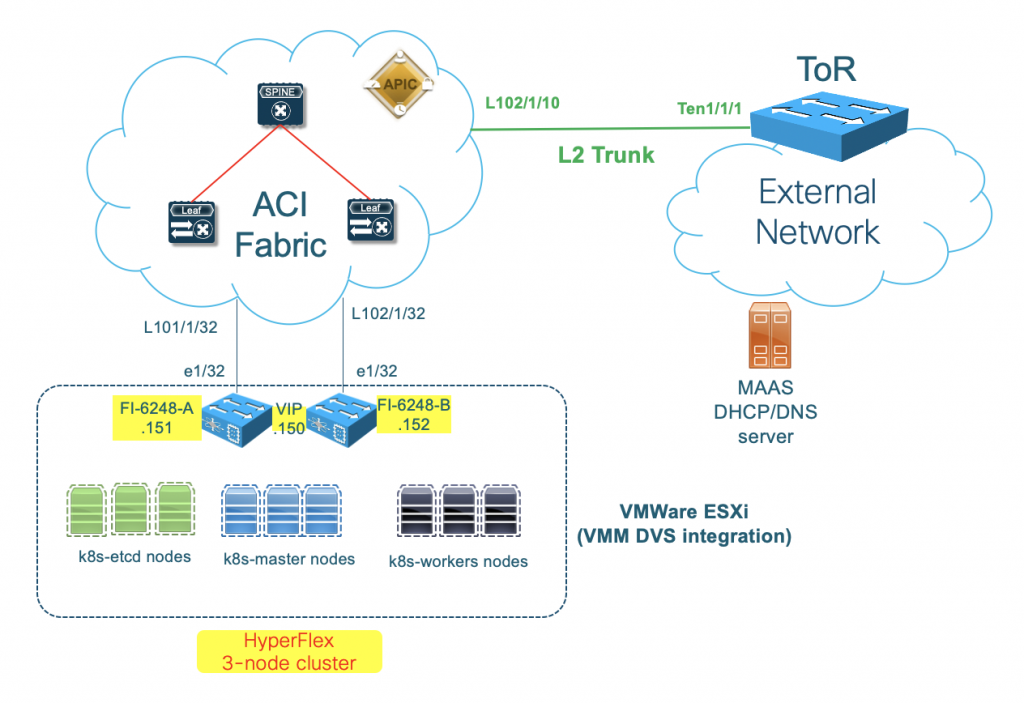
ACI will provide connectivity among nodes and pods, and from nodes to the external networks through L3Out. There is a dedicated vNIC in each node for server management tasks such as SSH. Over this management vNIC, Ansible client will connect to the node and automate the server installation.
There are many pieces that make up the whole setup. Therefore, instead of describing too much details each and every step, I will put the links to the materials that I used, so you can drill down more into those specifics if you want.
Preparation for the integration
Before we install the Kubernetes cluster using Ansible, there are some steps of the ACI installation we need to prepare in advance. We will follow the workflow described in Cisco official guide for Cisco ACI and Kubernetes Integration. Below are the details as in my setup, you may need to adapt for your own environment.
Planning for Kubernetes Integration
This step involves the planning of the necessary VLANs and IP subnets for the cluster setup. Below are the values that I use in my lab:
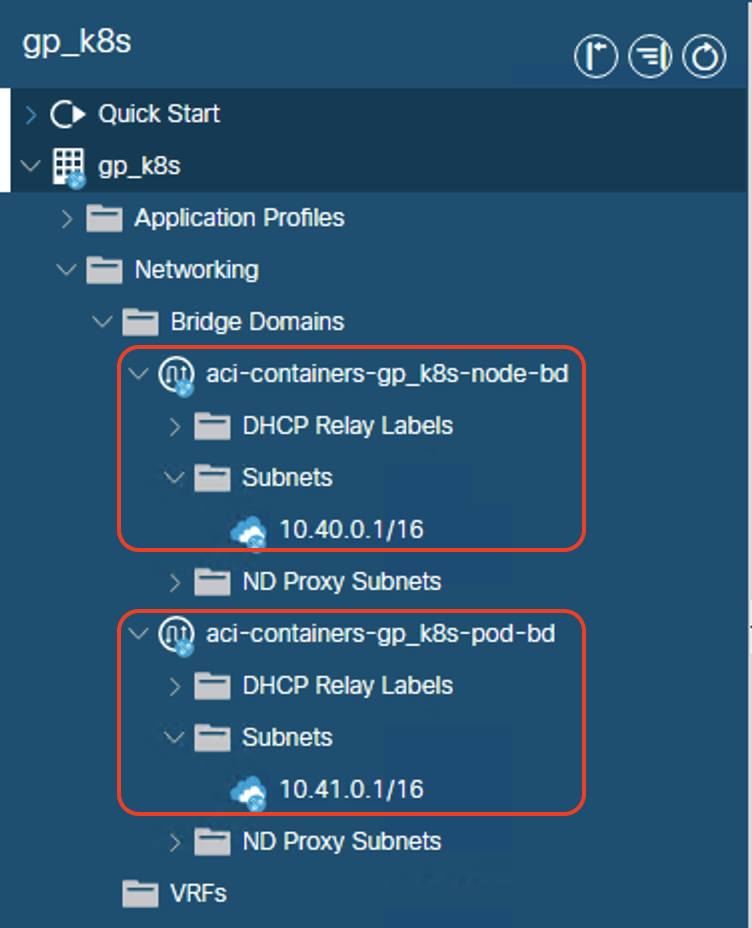
Subnets:
- Node subnet: 10.40.0.1/16
- Pod subnet: 10.41.0.1/16
- Node service subnet: 10.42.0.1/16
- External service subnets:
- Dynamic: 73.73.0.1/24
- Static: 74.74.0.1/24
VLANs:
- Node VLAN: 400
- Service VLAN: 402
- Infra VLAN: 300
These values will be put in the setup yaml file generated by the provision tool in later steps.
Prerequisites for Integrating Kubernetes with Cisco ACI
We need to make sure that we have already had a working ACI fabric setup, as we will have to refer to the existing ACI constructs in our setup yaml file. Below are some important parameters that we need to note down:
- AEP that ACI uses to connect to the VM nodes. In my case it is TO_HX_FI_DOMAIN_AttEntityP. For details on my HyperFlex cluster setup with ACI, you can read my previous tutorial here. It is important that you allow the Infra VLAN on this AEP.
- L3Out with functional L3 external connectivity to provide external access for the nodes/pods. In my setup I have configured a shared L3Out in tenant common:
- Tenant: common
- L3Out name: dc-out
- External networks: dc-out-ext-epg
- VRF: spdc-vrf
Provisioning Cisco ACI to work with Kubernetes
In this step, we will need to download the acc-provision tool from Cisco. This tool will provision the necessary ACI objects for the integration based on the input yaml file.
First, you need to make sure that you download the compatible integration package for your ACI and Kubernetes versions. Refer to ACI Virtualization Compatibility Matrix. At the time of this writing, the recommended integration version is 5.0(2.20200831) for my setup with Kubernetes 1.17 and ACI version 4.2(2f).
Next, you need to download the package for your operating system on software.cisco.com, and install the acc-provision tool on the client. The tool can generate a sample setup yaml file based on your Kubernetes flavor (version). The steps I used on my Ubuntu client machine:
tar xzvf dist-debs-5.0.2.0.tar.gz
sudo dpkg -i acc-provision_5.0.2.0-28_amd64.deb
acc-provision --sample -f kubernetes-1.17 > aci-k8s-containers-config.yaml
We can use any text editor to modify the content of the setup yaml file. In addition to the values in the previous 2 steps (such as subnets, VLANs, ACI AEP, L3Out, etc.), there are some other parameters we will need to give the provision tools. This part in the setup yaml file looks like below:
#
# Configuration for ACI Fabric
#
aci_config:
  system_id: gp_k8s             # Every opflex cluster must have a distinct ID
  apic_hosts:                   # List of APIC hosts to connect for APIC API
  - 10.138.157.40
  vmm_domain:                   # Kubernetes container domain configuration
    encap_type: vxlan           # Encap mode: vxlan or vlan
    mcast_range:                # Every opflex VMM must use a distinct range
      start: 225.20.1.1
      end: 225.20.255.255
    nested_inside:              # Include if nested inside a VMM;
                                #   required for CloudFoundry
                                #   supported for Kubernetes
      type: vmware              # Specify the VMM vendor (supported: vmware)
      name: HX-DVS            # Specify the name of the VMM domain
After you have made the required modifications, save the file and run the provision tool:
acc-provision -c aci-k8s-containers-config.yaml -o aci-k8s-containers.yaml -f kubernetes-1.17 -a -u admin -p $ACI_PASSWORD
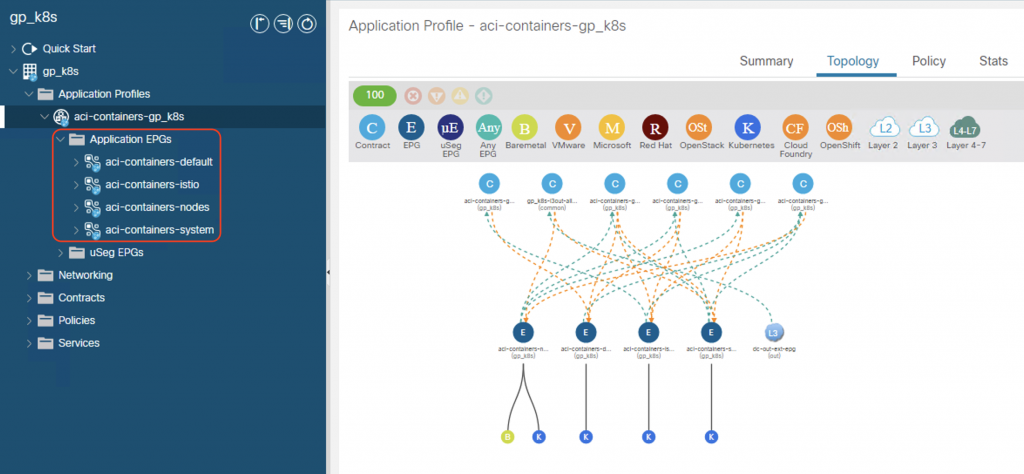
After the provisioning completes, if you navigate through ACI GUI you can see the ACI objects that the provision tool creates:
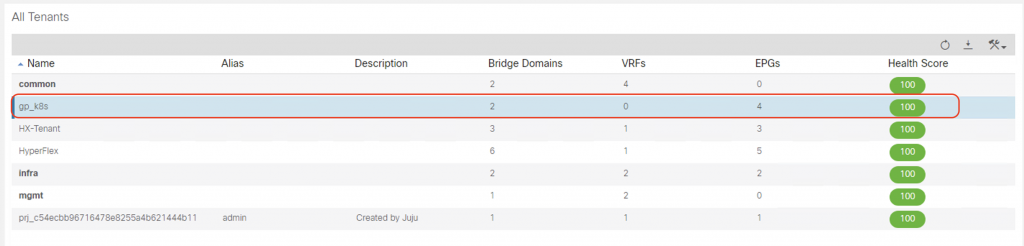
Tenant: a new tenant with the same name as system_id is created on ACI:
Bridge domains for nodes and pods within the newly created tenant:
The tenant EPGs for nodes and pods within the newly created tenant, including:
aci-containers-<system_id>-nodes: for node interfaces, mapped to PhysDomaci-containers-<system_id>-system: for system pods (such as core-dns), mapped to VMMDomaci-containers-<system_id>-default: EPG for all containers in all namespaces (by default)aci-containers-<system_id>-istio: EPG for Istio service mesh pods
The required contracts are automatically configured to ensure cluster functionality, such as health checks, DNS, ICMP, kube-api.
If you go to vCenter, you can see that a new port-group is defined with the same name as system_id, in my case it is gp-k8s. Notice that the necessary VLANs (Infra VLAN, Node VLAN, Service VLAN) are trunked on this port-group:
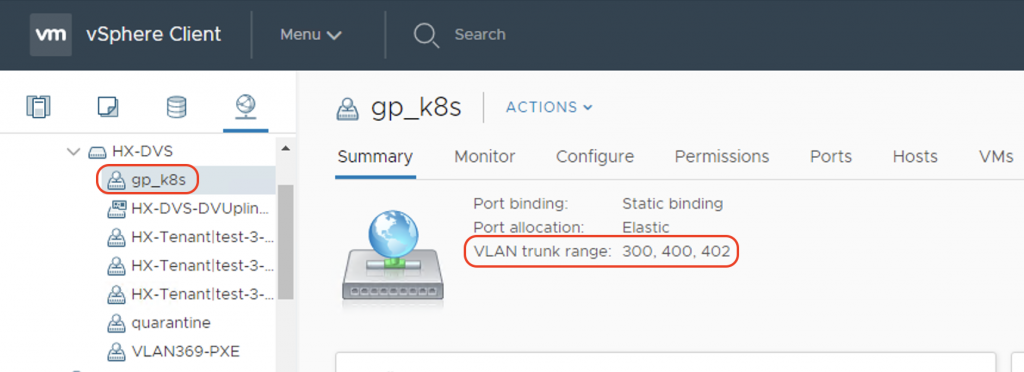
This port-group will be assigned to the second vNIC of the VM nodes.
Installing Kubernetes cluster
Now we can bring up our Kubernetes cluster with the help of Ansible for automated installation. I will describe the components that I used, and the tasks in the playbook that Ansible will perform.
Preparing the customized Ubuntu cloud image
To automate the spinning up process of the VMs on ESXi, we need to have a cloud image that will be cloned and customized into the required nodes. Based on this excellent tutorial, I made my own Ubuntu 18.04 cloud image with the following required packages:
[python-minimal ][kubelet, 1.17.11-00 ][kubectl, 1.17.11-00 ][kubeadm, 1.17.11-00 ][docker-ce, '5:19.03.12~3-0~ubuntu-bionic']
This step makes use of the cloud-init tool and VMWare customization specs. The VM template includes the user-data file which contains the public SSH key of the Ansible client. This allows Ansible to SSH into the VMs to automate installation tasks.
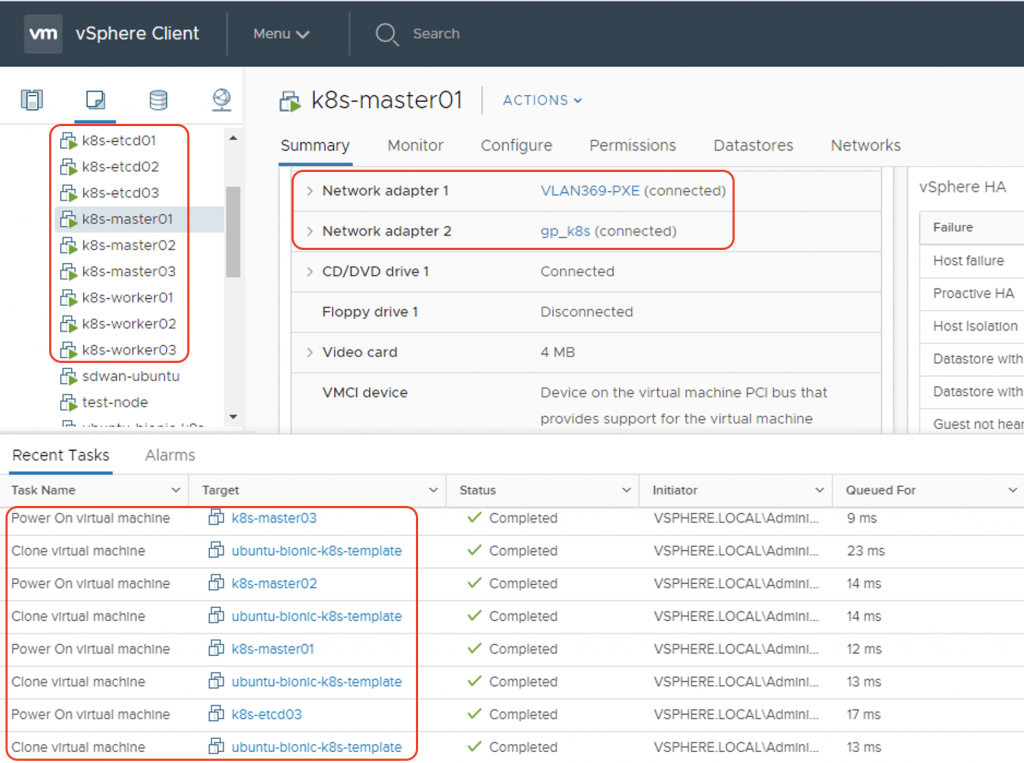
I also changed the default cloud image to have 2 virtual NICs for my required setup. One vNIC connects to the server management network providing DHCP/DNS/SSH connectivity. The other connects to ACI for K8S node and pod connectivity.
Ansible playbook for the automated Kubernetes cluster setup
In order to automate the steps, it is important to know the manual tasks that typically we will need to perform to get the job done. Below is the breakdown of what the playbook does.
Ansible inventory
The host file contains the VM host details and their associated variables that the playbook will use for the automation. What I provided in the host file is the FQDN host names with my cluster local domain name (ciscospdc.local), the node IP addresses (node_ip in the 10.40.0.0/16 range as planned). For nodes with other services like haproxy, the virtual IP of the LB shoud be defined, and it is contained in the parameter name lb_vip.
[k8s_etcds]
k8s-etcd01.ciscospdc.local ansible_user=ubuntu     node_ip=10.40.0.11
k8s-etcd02.ciscospdc.local ansible_user=ubuntu     node_ip=10.40.0.12
k8s-etcd03.ciscospdc.local ansible_user=ubuntu     node_ip=10.40.0.13

[k8s_masters]
k8s-master01.ciscospdc.local ansible_user=ubuntu   node_ip=10.40.0.14
k8s-master02.ciscospdc.local ansible_user=ubuntu   node_ip=10.40.0.15
k8s-master03.ciscospdc.local ansible_user=ubuntu   node_ip=10.40.0.16

[k8s_workers]
k8s-worker01.ciscospdc.local ansible_user=ubuntu   node_ip=10.40.0.21
k8s-worker02.ciscospdc.local ansible_user=ubuntu   node_ip=10.40.0.22
k8s-worker03.ciscospdc.local ansible_user=ubuntu   node_ip=10.40.0.23

[k8s_nodes:children]
k8s_etcds
k8s_masters
k8s_workers

[lb_nodes]
k8s-etcd01.ciscospdc.local lb_vip=10.40.0.10
k8s-etcd02.ciscospdc.local lb_vip=10.40.0.10
Spinning up the VMs on ESXi
In the playbook I use vmware_guest module to clone and customize the VM nodes. The module also assign the VMWare port-groups to the respective vNICs of the VMs.
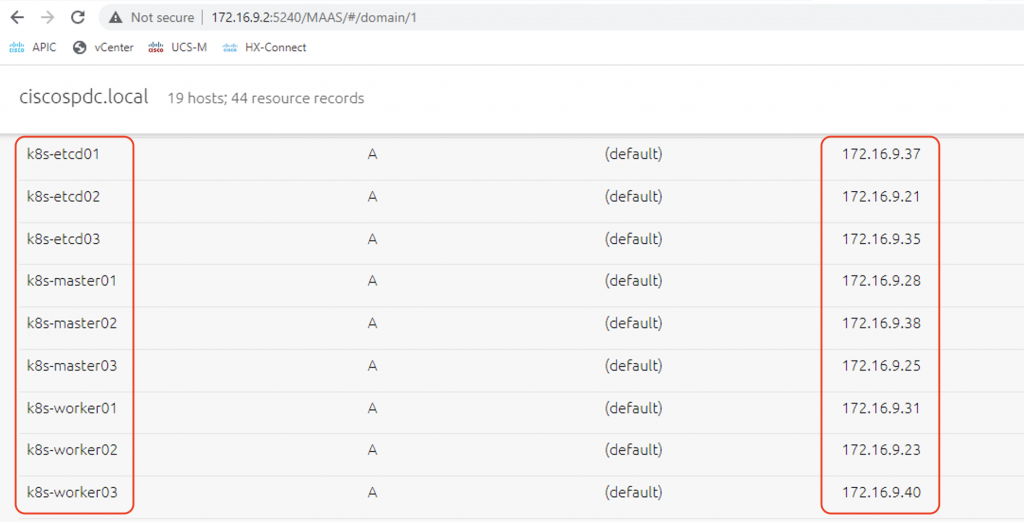
The VMs will power on after creation, where it will request its IP over the first vNIC (management network). I have a MAAS server running DHCP and DNS server in the same subnet which will provide the VMs management IP addresses. MAAS also automatically adds DNS entries to the domain so that the VMs can be accessed using their FQDNs.
Ansible will sit and wait until all the nodes can be reachable via SSH to continue the installation.
Preparing the Kubernetes Nodes
This is part of the required steps described in Cisco official guide. We need to set the correct MTU on the node interface (as we will use VXLAN and OpFlex over this interface), as well as config DHCP on the Infra VLAN subinterface.
Instead of working manually on each node, I use Ansible for automatic configuration of all the nodes using custom Jinja2 templates for the netplan and dhclient configurations.
Installation of the services on the servers
I put the installation steps described in the tutorial Configuring HA Kubernetes cluster on bare metal servers with kubeadm as the tasks in my Ansible playbook.
The playbook will:
- install HA etcd cluster with necessary security certificates and keys
- create an active/standby using
haproxyandheartbeaton the 2 etcd nodes as HA LB for multiple master nodes - configure a HA Kubernetes cluster using
kubeadm - apply ACI CNI plugin to have a fully working K8S cluster.
Final results
Run the Ansible playbook and let Ansible do its job.
ansible-playbook k8s-aci-bringup.yaml -i hosts

PLAY [localhost] ****************************************************************************************************************************************************************

TASK [Deploy the VMs and wait for connection] ***********************************************************************************************************************************
changed: [localhost] => (item=k8s-etcd01.ciscospdc.local)
changed: [localhost] => (item=k8s-etcd02.ciscospdc.local)
changed: [localhost] => (item=k8s-etcd03.ciscospdc.local)
changed: [localhost] => (item=k8s-master01.ciscospdc.local)
changed: [localhost] => (item=k8s-master02.ciscospdc.local)
changed: [localhost] => (item=k8s-master03.ciscospdc.local)
changed: [localhost] => (item=k8s-worker01.ciscospdc.local)
changed: [localhost] => (item=k8s-worker02.ciscospdc.local)
changed: [localhost] => (item=k8s-worker03.ciscospdc.local)
As the Ansible playbook is being run, you can take a look at vCenter. You can see the VM template being cloned into VMs and port-groups assigned to vNICs.
As the VMs boot up, they are assigned management IP addresses by MAAS. DNS A records are created for these VMs.
As all these nodes are reachable via SSH, Ansible will continue with the rest of the cluster bring up processes:
TASK [Wait 600 seconds for the nodes to be reachable] ***************************************************************************************************************************
ok: [k8s-etcd01.ciscospdc.local]
ok: [k8s-etcd02.ciscospdc.local]
ok: [k8s-etcd03.ciscospdc.local]
ok: [k8s-master01.ciscospdc.local]
ok: [k8s-master02.ciscospdc.local]
ok: [k8s-master03.ciscospdc.local]
ok: [k8s-worker01.ciscospdc.local]
ok: [k8s-worker02.ciscospdc.local]
ok: [k8s-worker03.ciscospdc.local]

<omitted>

PLAY RECAP **********************************************************************************************************************************************************************
k8s-etcd01.ciscospdc.local : ok=26   changed=22   unreachable=0    failed=0    skipped=0    rescued=0    ignored=0
k8s-etcd02.ciscospdc.local : ok=23   changed=19   unreachable=0    failed=0    skipped=0    rescued=0    ignored=0
k8s-etcd03.ciscospdc.local : ok=14   changed=10   unreachable=0    failed=0    skipped=0    rescued=0    ignored=0
k8s-master01.ciscospdc.local : ok=21   changed=19   unreachable=0    failed=0    skipped=0    rescued=0    ignored=0
k8s-master02.ciscospdc.local : ok=14   changed=12   unreachable=0    failed=0    skipped=0    rescued=0    ignored=0
k8s-master03.ciscospdc.local : ok=14   changed=12   unreachable=0    failed=0    skipped=0    rescued=0    ignored=0
k8s-worker01.ciscospdc.local : ok=11   changed=9    unreachable=0    failed=0    skipped=0    rescued=0    ignored=0
k8s-worker02.ciscospdc.local : ok=11   changed=9    unreachable=0    failed=0    skipped=0    rescued=0    ignored=0
k8s-worker03.ciscospdc.local : ok=11   changed=9    unreachable=0    failed=0    skipped=0    rescued=0    ignored=0
localhost                  : ok=1    changed=1    unreachable=0    failed=0    skipped=0    rescued=0    ignored=0
The playbook also configures kubectl on all master nodes. We can now SSH from the client to any Kubernetes master node and check the cluster status:
ssh ubuntu@k8s-master01.ciscospdc.local

ubuntu@k8s-master01:~$ kubectl get nodes
NAME           STATUS   ROLES    AGE    VERSION
k8s-master01   Ready    master   118m   v1.17.11
k8s-master02   Ready    master   109m   v1.17.11
k8s-master03   Ready    master   109m   v1.17.11
k8s-worker01   Ready    <none>   108m   v1.17.11
k8s-worker02   Ready    <none>   108m   v1.17.11
k8s-worker03   Ready    <none>   108m   v1.17.11

ubuntu@k8s-master01:~$ kubectl get pods --all-namespaces
NAMESPACE               NAME                                         READY   STATUS    RESTARTS   AGE
aci-containers-system   aci-containers-controller-766689fd6f-ggf9f   1/1     Running   0          121m
aci-containers-system   aci-containers-host-25sfm                    3/3     Running   0          111m
aci-containers-system   aci-containers-host-6hwr8                    3/3     Running   0          112m
aci-containers-system   aci-containers-host-ldjh4                    3/3     Running   0          111m
aci-containers-system   aci-containers-host-sc4kh                    3/3     Running   0          121m
aci-containers-system   aci-containers-host-vkhsc                    3/3     Running   0          111m
aci-containers-system   aci-containers-host-xshfg                    3/3     Running   0          112m
aci-containers-system   aci-containers-openvswitch-27rm6             1/1     Running   0          121m
aci-containers-system   aci-containers-openvswitch-bmw2h             1/1     Running   0          112m
aci-containers-system   aci-containers-openvswitch-ft8t9             1/1     Running   0          111m
aci-containers-system   aci-containers-openvswitch-jk6sv             1/1     Running   0          111m
aci-containers-system   aci-containers-openvswitch-p64r7             1/1     Running   0          111m
aci-containers-system   aci-containers-openvswitch-wzsd4             1/1     Running   0          112m
aci-containers-system   aci-containers-operator-6766667478-njl4w     1/1     Running   0          121m
istio-operator          istio-operator-75c4bc6984-9kdhj              1/1     Running   0          115m
istio-system            grafana-5cc7f86765-vx8jl                     1/1     Running   0          99m
istio-system            istio-egressgateway-65d4884678-pndk6         1/1     Running   0          99m
istio-system            istio-ingressgateway-fd767455d-t2dhs         1/1     Running   0          99m
istio-system            istio-tracing-8584b4d7f9-rnnbn               1/1     Running   0          98m
istio-system            istiod-55dc75dfb5-plw9h                      1/1     Running   0          99m
istio-system            kiali-696bb665-55g4x                         1/1     Running   0          98m
istio-system            prometheus-77b9c64b9c-6424w                  2/2     Running   0          98m
kube-system             coredns-6955765f44-2c79h                     1/1     Running   0          121m
kube-system             coredns-6955765f44-ms6fx                     1/1     Running   0          121m
kube-system             kube-apiserver-k8s-master01                  1/1     Running   0          121m
kube-system             kube-apiserver-k8s-master02                  1/1     Running   0          112m
kube-system             kube-apiserver-k8s-master03                  1/1     Running   0          112m
kube-system             kube-controller-manager-k8s-master01         1/1     Running   0          121m
kube-system             kube-controller-manager-k8s-master02         1/1     Running   0          112m
kube-system             kube-controller-manager-k8s-master03         1/1     Running   0          112m
kube-system             kube-proxy-5mjd9                             1/1     Running   0          112m
kube-system             kube-proxy-7xvgl                             1/1     Running   0          111m
kube-system             kube-proxy-jd9f2                             1/1     Running   0          111m
kube-system             kube-proxy-ngtbp                             1/1     Running   0          111m
kube-system             kube-proxy-t4zbb                             1/1     Running   0          121m
kube-system             kube-proxy-ztb9t                             1/1     Running   0          112m
kube-system             kube-scheduler-k8s-master01                  1/1     Running   0          121m
kube-system             kube-scheduler-k8s-master02                  1/1     Running   0          112m
kube-system             kube-scheduler-k8s-master03                  1/1     Running   0          112m
Now check on ACI, you can see that ACI has now gained visibility into our Kubernetes cluster:
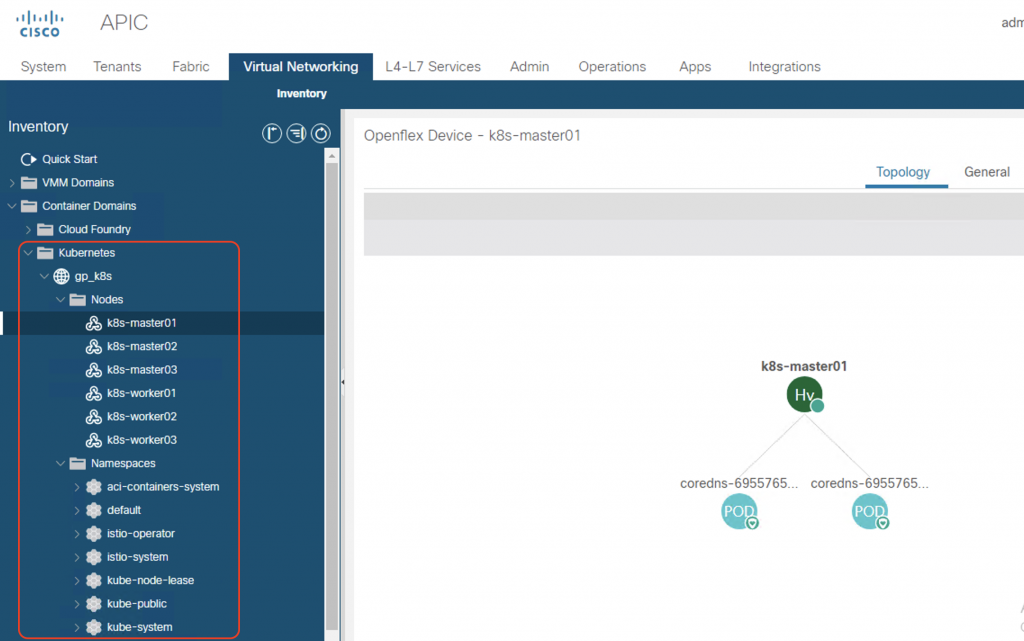
That’s all there is to it. You have had a high-available multi-master Kubernetes cluster running with ACI CNI integration.
I hope this post is informative for you. In my future posts, I will write more about Kubernetes CNI, ACI CNI implementation details and the different isolation deployment models. So stay tuned for my further updates!
hi Giang,
bài viết hay quá, cho mình xin bài lab này về lab nhé